Everything is all good, until it’s um… not, then all goes so wrong. Next minute, some guy off the internet scarpers with thousands of confidential client records and then has the audacity to demand money.
Well as it happens, you hadn’t implemented robust API security and that random internet guy found a security flaw—whether by exposing credentials, compromising a user or machine session, or tricking your API into returning information without needing authentication. All it takes is one event for your digital empire to come crashing down, then comes all the public mistrust, court cases, and countless hours of investigation…
Was it worth it?
Technology changes all the time and new vulnerabilities are always found. It is possible that what is perceived to be completely secure in one moment may have a vulnerability in the next. OAuth 2.0 standards are always being updated to keep up with current vulnerabilities so that it can remain as secure as possible. Overtime methods may change or become deprecated; you should always review security settings regularly to stay ahead of the curve and protect your digital empire. By the end of this blog, you will learn three different OAuth 2.0 methods: client credentials grant, authorisation code grant, and JSON Web Token (JWT) bearer grant. I will briefly explain what they are and some of their caveats, highlight pros and cons, and show examples of the processes in action.
Note: OAuth 2.0 isn’t a magic bullet on its own but should be part of a greater security solution where best practices and other security measures are implemented, such as using HTTPS, permissions with least privilege, encrypting credentials, etc.
OAuth 2.0
There are several ways you can implement OAuth via grant types, and each one will offer different advantages depending on your security requirements. Some are relatively straight forward, and some are more complicated. I will talk in detail about some of the common ones below, so you can get a grasp of what is available and how they work.
Client Credentials Grant Type
Client Credentials seems like a straightforward choice for securing your Machine to Machine (M2M) applications as it is easy to implement and maintain. It could be a good option if your application is not able to create signed JWT tokens and cannot be implemented yet or at all (see JWT Bearer Grant Type below).
It usually requires use of a client ID and client secret to authenticate with the authorisation server, then the authorisation server returns an access token which can be used to authorise with the API.
One consideration to have is how the client secret is sent over the internet. In theory it is encrypted with HTTPS and is hard for an attacker to expose it, assuming you have disabled HTTP and other older protocols completely; however, you should also consider how the client secret is stored and if it is exposed at any time before leaving the client and after reaching the authorisation server.
Pros:
- Easy to implement
- Less prone to implementation errors
- Credentials can be deactivated and renewed if leaked
Cons:
- Small chance the client secret may be leaked due to being sent over the internet
- Hard to rotate client secrets, risk of breaking integrations
- Adding advanced security adds complexity
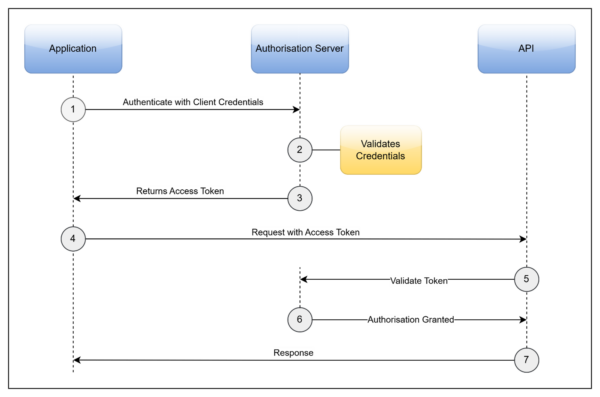
Figure 1: Sequence Diagram of the OAuth 2.0 Client Credentials Process
Steps of the process:
- The application sends a request to the Authorisation Server containing the client ID and secret.
Example request:POST /oauth HTTP/1.1 Host: oauth.example.com Content-Type: application/x-www-form-urlencoded { "client_id": "1ca8d7f8-3d71-4513-b1e7-b8d5c894aabe", "client_secret": "c748cca6-ce02-491e-93cf-1bec3dcbf454", "grant_type": "client_credentials", "scope": "read,write" } - Authorisation returns an access token, usually as a JWT but sometimes a key.
Example response:{ "access_token": "eyJhbGciOiJIUzI1NiIsInR5cCI6IkpXVCJ9.eyJzdWIiOiIxMjM0NTY3OD.iOeNU4dAFFeBwNj6qdhdvm-IvDQrTa6R22lQVJ", "token_type": "Bearer", "expires_in": 3600, "scope": "read,write" } - Application makes a final request to the API using the access token to authenticate.
Example request:GET /protected/resource HTTP/1.1 Host: api.example.com Authorization: Bearer eyJhbGciOiJIUzI1NiIsInR5cCI6IkpXVCJ9.eyJzdWIiOiIxMjM0NTY3OD.iOeNU4dAFFeBwNj6qdhdvm-IvDQrTa6R22lQVJ
- The API validates the access token with the authorisation server and responds successfully with requested data or success status code.
Authorisation Code Grant Type with PKCE
The Authorisation Code Grant Type with Proof Key for Code Exchange (PKCE) is an ideal method for applications that are public-facing as no credentials are stored, which prevents them from being exposed and compromised. This grant type requires a user to physically log in and approve the application to grant its access to the downstream system.
The authorisation process includes generation of a code verifier, which is a cryptographically random key, and generation of a code challenge created from the code verifier. The code challenge is stored by the authorisation server and is used to verify it against the code verifier that is sent in future token requests. The application is given an authorisation code which can only be used once to request an access token. If set up, the authorisation server can also return a new refresh token each time an access token is requested, the refresh token can be used to request an access token next time, and this allows the application to continue to access to the downstream system without user intervention after approval. The access token is sent with the request to the downstream system, the downstream system authenticates with the authorisation server, and will return a successful response.
If refresh tokens are enabled, then the application will exchange an access token for the refresh token. It is recommended that refresh token rotation is enabled so that a new refresh token is returned every time the application requests an access token.
The old Authorisation Code method that does not use PKCE is no longer secure due vulnerabilities in the authorisation process such as authorisation code interception, man-in-the-middle attacks, and Cross-Site Request Forgery (CSRF).
Pros:
- PKCE helps prevent malicious attacks due to its code verifier and challenge mechanism
- Good for applications that cannot store a client secret
- Most secure option for public facing applications
Cons:
- User interaction is required before requesting token each time (unless refresh tokens are implemented)
- Increased overhead, may slow down performance
- Not all OAuth 2.0 providers support PKCE
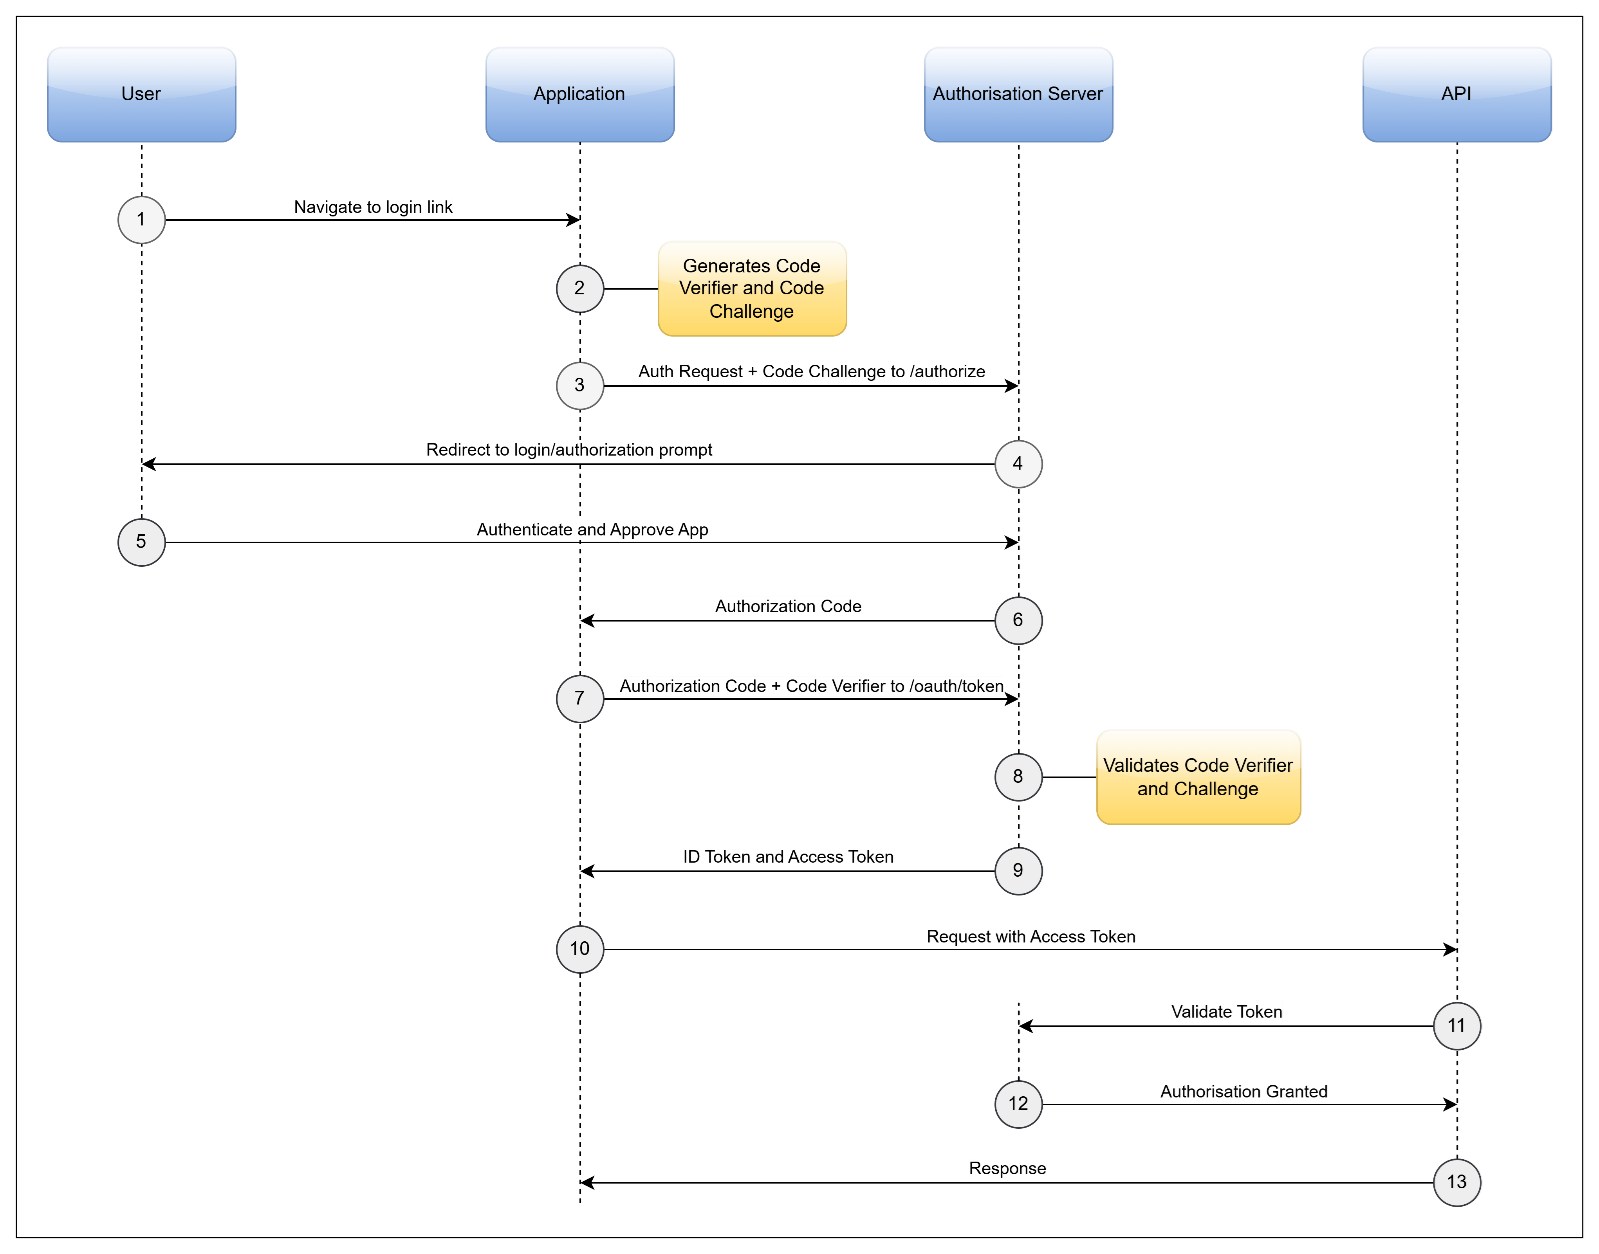
Figure 2: Sequence Diagram of the OAuth 2.0 Authorisation Code PKCE Process
Steps of the process:
- User opens a browser and navigates to the applications login link.
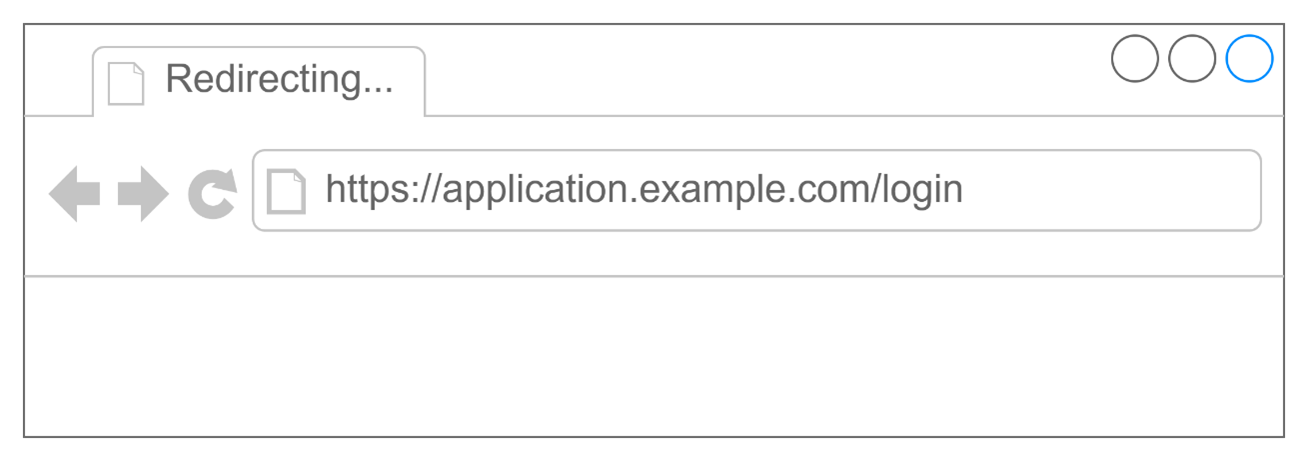
- The application then generates a code verifier and uses it to generate a code challenge.
- The application sends an authorisation code request to the authorisation server with the code challenge.
POST /oauth/authorize? response_type=code&client_id=1ca8d7f8-3d71-4513-b1e7-b8d5c894aabe&redirect_uri=http://oauth.example.com/callback &scope=openid&state=xyzABC123&code_challenge=Xj3VIkuJ4SxouRO39A84mBjw3BF6NUWCgCDTTEblA2U&code_challenge_method=S256 HTTP/1.1 Host: oauth.example.com
- The application will redirect the browser to a login page provided by the authorisation server.
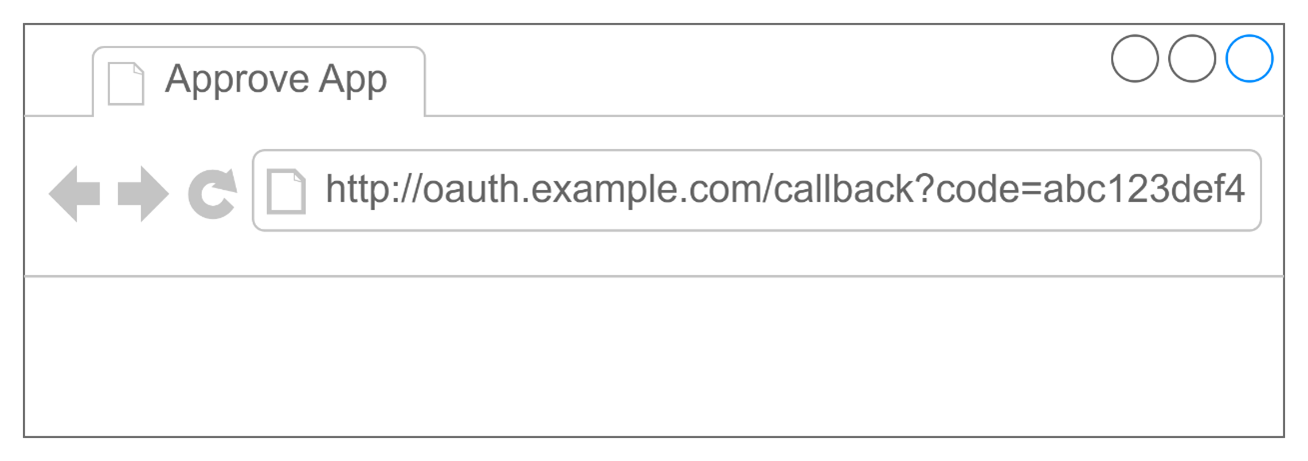
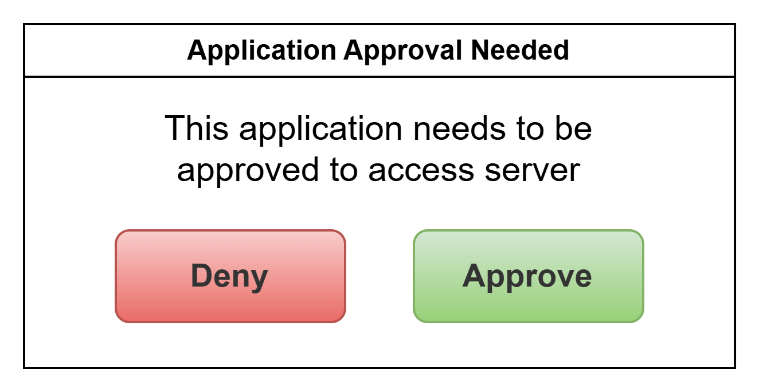
- The user logs in using their credentials and approves the application.
- The application retrieves the authorisation code from the redirect URL provided from the authorisation server.
http://oauth.example.com/callback?code=abc123def456&state=xyzABC123
- The application then sends the authorisation code and code verifier to the token endpoint.
POST /oauth/token HTTP/1.1 Host: oauth.example.com Content-Type: application/x-www-form-urlencoded { "grant_type": "authorization_code" "code": "abc123def456" "redirect_uri": "http://oauth.example.com/callback?code=abc123def456&state=xyzABC123" "client_id": "1ca8d7f8-3d71-4513-b1e7-b8d5c894aabe" "code_verifier": "45bncuC_5DLibgtt7TgSbRrW6DkWbcrRGj2nrupuu80" } - The authorisation server then using the authorisation code to fetch the code challenge it received earlier will then validate it against the code verifier.
- The authorisation server then returns the access token and a refresh token if applicable.
{ "access_token": "eyJhbGciOiJSUzI1NiIsInR5cCIgOiAiS.yZWZlcnJlZF91c2VybmFtZSI6ImpvaG4ifQ.C0723Ejex8k8dVGzTT2IRtEYXymAONBMk", "expires_in": 60, "refresh_expires_in": 1800, "refresh_token": "eyJhbGciOiJIUzI1NiIsInR5cCIgOiAiSldUIiw.eyJqdGkiOiJiOGYxZDJmZi1mNmYzLTRiYTEtYjU3OC0zMmMx.KmzF-T3meYK1m72ShHQGA3G0VGVA6GYXNIMZVoHkx9Q", "scope": "openid email profile", "session_state": "af09d80d-9901-445f-b789-c6dfa33ec175", "token_type": "bearer" } - The application then makes a request to the downstream API using the access token in the authorisation header.
GET /protected/resource HTTP/1.1
Host: api.example.com
Authorization: Bearer eyJhbGciOiJIUzI1NiIsInR5cCI6IkpXVCJ9.eyJzdWIiOiIxMjM0NTY3OD.iOeNU4dAFFeBwNj6qdhdvm-IvDQrTa6R22lQVJ
- The API validates the access token with the authorisation server and responds with requested data or success status code.
Note: If the application uses refresh tokens, then it will use that to fetch a new token from the authorisation server.
JWT Bearer Grant Type
The JWT Bearer Grant Type is one of the best ways to secure your APIs as no credentials are ever sent across the internet. Instead, JWT assertion tokens are used and signed using strong cryptography which means they can’t be tampered with as the signature would no longer match, and of course the valid signature can only be created using the private key associated with a certificate. With strong cryptographically signed and short-lived JWT tokens, it makes them a lot harder to be compromised by an attacker.
Don’t be confused—originally JWT assertion tokens were used in conjunction with Client Credentials Grant Type; however, due to the highly secure benefits signed JWTs offer, it was given its own grant type. Consider that some authorisation servers may treat this differently depending on how and when they were implemented.
The private key is used to sign the JWT and the public certificate is used to verify it. A private key is highly sensitive and should never be shared. If it ever got into the wrong hands, then it would need to be thrown away and a new certificate and key pair would need to be created. In an environment with multiple different systems, separate certificates and key pairs would also be recommended to mitigate risk. It is recommended that the certificate is signed by a Certificate Authority, as this ensures that certificate will be trusted by all parties and is generally good practice.
For an application to connect to a downstream system, the application would generate a signed JWT using the private key and cryptography methods. The application would then send the JWT to the authorisation server, then the JWT is validated by using the public certificate. You cannot sign the JWT using the public certificate and cannot verify the JWT using the private key.
Pros:
- Most secure option for M2M scenarios as no secrets are sent over the internet
- Generated on the fly, and short-lived
- Supports signing with strong cryptographic algorithms (e.g PS256 or ES256)
Cons:
- More complex implementation
- Once a JWT is issued, it cannot be easily revoked before expiration
- More care and attention required to implement properly (e.g. not signing the token using a secure algorithm or using long expiration times)
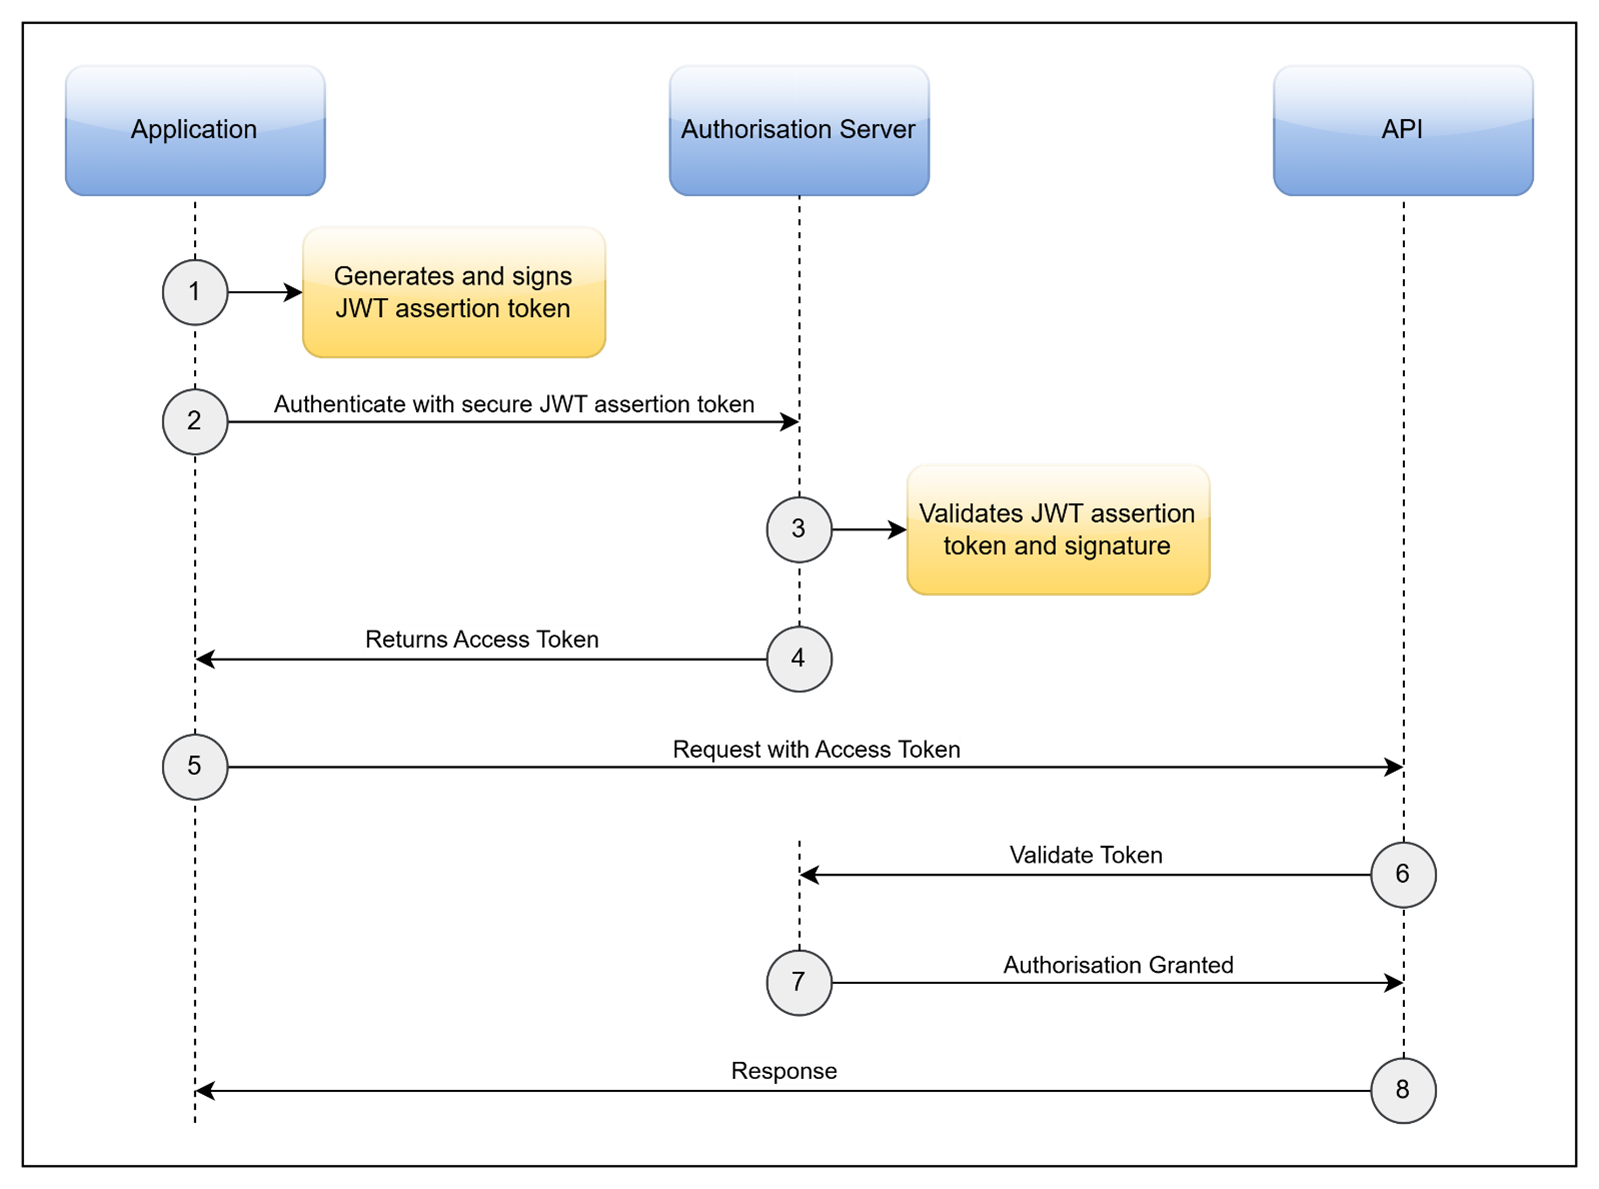
Figure 3: Sequence Diagram of the OAuth 2.0 JWT Bearer Process
Steps of the process:
- Application will generate a header and payload with appropriate fields and values, it will then generate a JWT token and sign it using cryptography with a signing algorithm (e.g. PS256 and private key).JWT Header Example:
{ "alg": "PS256", "typ": "JWT", "x5t": "U29tZVJhbmRvbVRleHRIZXJl", }JWT Payload Example:
{ "sub": "1ca8d7f8-3d71-4513-b1e7-b8d5c894aabe", "iat": 1516239022, "exp": 1516242622, "aud": "https://oauth.example.com/oauth/token", "iss": "1ca8d7f8-3d71-4513-b1e7-b8d5c894aabe" } - The application will then request an access token from the authorisation server using the signed JWT token to authenticate.
POST /oauth/token HTTP/1.1 Host: oauth.example.com Content-Type: application/x-www-form-urlencoded { "grant_type": "client_credentials" "client_assertion_type": "urn:ietf:params:oauth:grant-type:jwt-bearer" "client_assertion": "eyJhbGciOiJIUzI1NiIsInR5cCI6IkpXVCJ9.eyJzdWIiOiIxMjM0NTY3OD.iOeNU4dAFFeBwNj6qdhdvm-IvDQrTa6R22lQVJ" "scope": "default" } - The authorisation server will then validate the JWT token by verifying it using the public certificate.
- The authorisation server will return the access token to the application.
{ "token_type": "Bearer", "expires_in": 3599, "ext_expires_in": 3599, "access_token": "eyJhbGciOiJIUzI1NiIsInR5cCI6IkpXVCJ9.eyJzdWIiOiIxMjM0NTY3OD.iOeNU4dAFFeBwNj6qdhdvm-IvDQrTa6R22lQVJ" } - The application then makes a request to the downstream API using the access token in the authorisation header.
GET /protected/resource HTTP/1.1
Host: api.example.com
Authorization: Bearer eyJhbGciOiJIUzI1NiIsInR5cCI6IkpXVCJ9.eyJzdWIiOiIxMjM0NTY3OD.iOeNU4dAFFeBwNj6qdhdvm-IvDQrTa6R22lQVJ
- The API validates the access token with the authorisation server and responds successfully with requested data or success status code.
Implementation
There are many fantastic libraries available for creating and signing JWT tokens (visit Libraries for Token Signing/Verification to see a list). I’ve provided a basic snippet of a C# sample below to give an idea of the process of creating the token and signing it using the PS256 (PSS-RSA with 256 bits) algorithm.
C# Example
using System;
using System.Collections.Generic;
using System.IdentityModel.Tokens.Jwt;
using System.Security.Claims;
using Microsoft.IdentityModel.Tokens;

public class JwtGenerator
{
    public static string GenerateJwt()
    {
        // Create RSA key
        var rsa = RSA.Create(2048);
        var key = new RsaSecurityKey(rsa);

        // Create signing credentials
        var signingCredentials = new SigningCredentials(key, SecurityAlgorithms.RsaSsaPssSha256);

        // Define token descriptor
        var tokenDescriptor = new SecurityTokenDescriptor
        {
            Issuer = "your-issuer",
            Audience = "your-audience",
            Subject = new ClaimsIdentity(new List<Claim>
            {
                new Claim("sub", "1234567890"),
                new Claim("name", "John Doe"),
                new Claim("iat", DateTimeOffset.UtcNow.ToUnixTimeSeconds().ToString())
            }),
            Expires = DateTime.UtcNow.AddMinutes(30),
            SigningCredentials = signingCredentials
        };

        // Create token handler
        var tokenHandler = new JwtSecurityTokenHandler();
        var token = tokenHandler.CreateToken(tokenDescriptor);

        // Return serialized token
        return tokenHandler.WriteToken(token);
    }
}
Using packages System.IdentityModel.Tokens.Jwt and Microsoft.IdentityModel.Tokens
Algorithms
There are a few algorithms you can use:
- RSASSA-PSS (RSA Probabilistic Signature Scheme) – Asymmetric
- PS256: RSASSA-PSS using SHA-256
- PS384: RSASSA-PSS using SHA-384
- PS512: RSASSA-PSS using SHA-512
- RSA (Rivest-Shamir-Adleman) – Asymmetric
- RS256: RSASSA-PKCS1-v1_5 using SHA-256
- RS384: RSASSA-PKCS1-v1_5 using SHA-384
- RS512: RSASSA-PKCS1-v1_5 using SHA-512
- ECDSA (Elliptic Curve Digital Signature Algorithm) – Asymmetric
- ES256: ECDSA using P-256 and SHA-256
- ES384: ECDSA using P-384 and SHA-384
- ES512: ECDSA using P-521 and SHA-512
- HMAC (Hash-based Message Authentication Code) – Symmetric
- HS256: HMAC using SHA-256
- HS384: HMAC using SHA-384
- HS512: HMAC using SHA-512
Note: It is not advisable to use HMAC due to requiring a symmetric key where the same key is used to both sign and validate the JWT.
OAuth 2.0 Best Practices
- A secure HTTPS connection should be used, just like with any other internet traffic. HTTP and other older protocols should be disabled.
- Use principle of least privilege, restrict to minimal scopes as needed. Applications should use its own client ID or other identifier if it requires access to different resources. Scopes should be configured against the authorisation server as per identifier credentials.
- Access tokens or assertion tokens should not be valid for long periods of time and recommended not to exceed 1 hour before expiring, including JWT tokens.
- Assertion tokens should always be regenerated before requesting authentication, they should never be stored, including JWT assertion tokens.
- If possible, implement functionality to be able to revoke tokens in the event they become compromised.
- Private keys that are used to sign the JWT assertion token or enable HTTPS should never be shared with an external party. Each party should have their own public certificate and private key, only the public certificates should ever be shared.
- Credentials should never be shared with anyone who does not require them, all secrets (e.g. passwords, client-secrets) should be encrypted and private keys should be stored in a key vault or keystore if possible.
- Ensure certificates and credentials have a suitable expiration time and won’t last indefinitely, never changing these increases the chances of them being compromised.
Why You Need API Security with OAuth 2.0
Security is often an afterthought but shouldn’t be. Your digital empire is absolutely worth the time and small cost to provide it with the most up–to–date security implementations, so why should you skimp on it? An investment in good API security mitigates risks of being compromised and suffering significant financial losses down the line, not to mention the mess that comes with it. Using OAuth 2.0 security on your APIs is a step closer to ensuring that your digital empire is safer.
When it comes to your M2M API authorisation, it is probably easier to go with the Client Credentials approach, and you’ll probably be okay, but if you want stronger security, then you should use JWT Bearer grant. If your API is public-facing, then it is better and more secure to implement the OAuth 2.0 Authorisation Code Grant Type with PKCE.
While it can be a very daunting mission to choose the best security solutions among other things, I at least hope I have enabled you to make a more informed choice to help you choose the best API security method in authorising your applications and helping to protect your digital assets from those nasty internet people.


